
When Swann asked us if we wanted to review the newly launched AllSecure650 2K Wireless Security Kit, we were very keen to do so for a few reasons.
1. Swann, as an Aussie business, is at the forefront of DIY home protection and are a very innovative mob.
2. We here at DRN have written about their products for a good part of the 35 years Swann have been growing their business and my first Swann DVR Combo Kit review was published nearly 15 years ago.
3. I’m particularly excited about the features of this new AllSecure650 kit and I’ll tell you why shortly.
What is the AllSecure650 2K Wireless Security Kit all about?
Protection of our homes and families is of paramount importance in this ever-increasing crime-ridden world.
That applies for homeowners and renters equally, although renters generally don’t have the option of installing elaborate wired cameras.
This is why a totally wireless solution is often preferred.
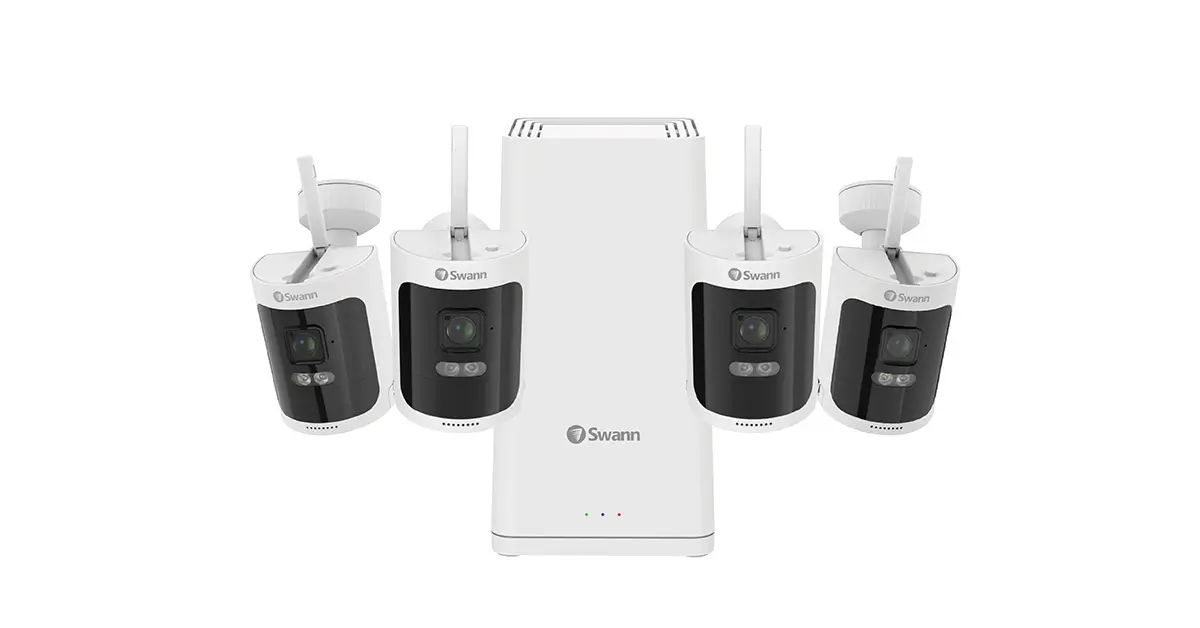
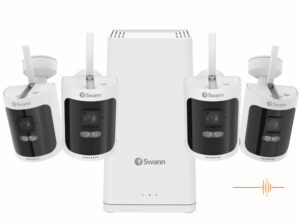
This AllSecure650 kit comes with 3 or 4 cameras that are wire-free (no power cable or data transmission cable).
Power comes from an internal rechargeable battery that can be easily switched out for the spare one that sits in the Wi-Fi NVR Power Hub.
So that means no downtime to charge the individual batteries. And the most brilliant aspect of having that spare battery in the hub is the fact that if the power goes out, that battery will function as a mini-UPS to power the hub for about 5 hours!
That’s why they came up with the moniker of AllSecure: always charged and always secure…
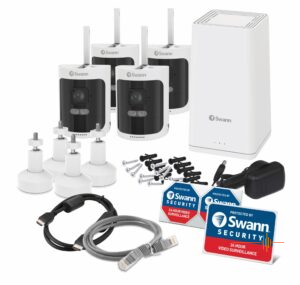
When you unbox this kit you’ll find that everything you need to install this security system is there, down to all the cables (HDMI, ethernet, USB-C) down to all the mounting screws and even a mouse!
A mouse?? Yeah, we’ll come to that later.
Just look at what’s in the box (even though it does not show the mouse nor some extra charge cables…):
First a Few More Features
Video resolution is quite a notch up from the standard 1080p high resolution. These NVW-600CMB cameras sport a 2k resolution for enhanced detail in the videos.
The cameras come with heat & motion detection, sensor spotlights (even sirens!), person detection, 2-way audio and powerful night vision up to 30m and colour night vision up to 10m.
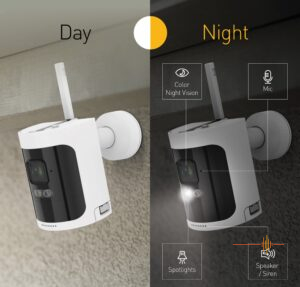
Of course, they are IP66 weatherproof too.
We’ll let you know in the Testing segment how we fared with all these specs, battery life, easy of set-up and wireless range.
Recording
The other great idea implemented in the Power Hub is a 1TB hard disk drive for storing up to two years of video.
That’s great because I’m not a fan of storing security videos in the cloud, apart from the fact that on my rural property I don’t have unlimited data.
Of course you can also send backup clips to the cloud if you so desire with this Kit.
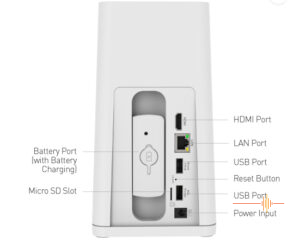
The Power Hub has plenty of ports to accommodate any sort of connection to or expansion of the system.
See the image below.
Finally, the Power Hub also stitches video activity clips together for fast and easy playback.
Installation
With all these components it could be daunting to set it all up properly. In the “olden days” – going back some 10 or 15 years, that process was not always easy for most average folks.
Is it any different today?
Well, it was a bit of a mixed experience.
I’m a stickler for reading the manual first to set up a complex system.
The documentation was good, even though spread out over 3 leaflets.
All went well until it came to getting a live view from the cameras. They seemed to be connected to the hub (the cameras in this system are paired with the hub in the factory) and online but no joy seeing a feed on the computer or on the app…
Tried several restarts and other tricks, learned over a lifetime dealing with computers but, other than learning the AllSecure650 needs the 2.4 GHz WiFi rather than a 5 GHz band, still no live feed from the cameras.
Time to try out Swann Support.
They were quick to respond but other than some general checks on the obvious settings, my problem seemed to warrant a Level 2 intervention. And that call would have to wait a couple of days…
Even though Swann is an Australian outfit, their support -as with many companies – is outsourced to the Philippines.
Anyways, I didn’t want to wait that long and dove a bit deeper into the setup software.
The silly thing I discovered was that the cameras apparently were NOT paired to the Hub!
Or, for some reason, became unpaired in my setup process…
So, after having resolved that issue, the livestream quickly came on.
Playing around with the setup software, whilst pretty comprehensive, I felt that it could do with some info to help us make the choices on the menu.
And that’s where the Manual comes in: download this and most of your queries will be answered.
Probably for security reasons, the system constantly asks you to login.
That’s when I changed my strong password to an easier to type password during this setup phase.
Typing with the included mouse on the onscreen keyboard became a bit tedious after a while…
Hint: there is a setting where you can change the frequency of having to re-login and even switch off the timer.
Just don’t forget to switch it back to the default when you’re done with the setup and tweaking.
In my case it took several days of finetuning before I was happy with the system.
It will work right out of the box for most people, but it seems we here at DRN push our gear to the limits when we test…
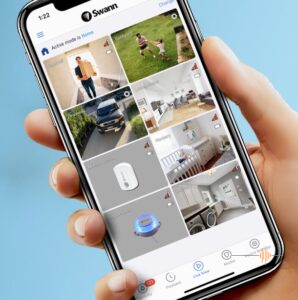 The App
Most people would interact with their security system through the app.
That’s a lot easier and more intuitive even though I constantly had to refresh the app.
The app will send notifications when an event occurs, like persons detected.
I noticed that this warning came about 10 to 20 seconds after I walked through a camera’s detection zone.
Not super quick but the recording does start pretty much when a person triggers the sensor.
And it even “pre-records” – a trick where the sensor field of view is a bit bigger than that of the camera …
The Swann Security app sends notifications to users’ smartphones when the camera senses heat from large objects like people and cars.
The so-called True Detect feature leads to more reliable monitoring and fewer false alarms.
The app also features a digital zoom. That’s handy if you need to see more detail of number plates and faces.
Finding the Right Spots for Mounting
We’ve got a fairly large 11 acre property so no problems finding some good places to mount the cameras.
I wanted to cover the gate and 2 or 3 corners of the house.

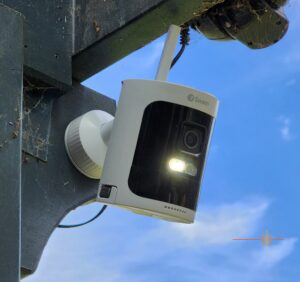
The wide angle (105 degrees) is wide but not too wide to distort the view. Mounting them is easy and they can be angled and swivelled in many ways.
How far from the Hub can you mount the cams, you ask?
Home on the Range
Well, I was hoping the cam to monitor the driveway gate would well be within the published range.
That range is up to 30m, but typical would be 15m.
My ideal distance would be in the 35-40m range so that’s pushing it.
How did it go?
I had to compromise a bit on the best distance. 35m is only just doable with straight line vision. WiFi strength is medium. The other camera at the side of the house is at 25m and only with 1 bar on the WiFi strength.
The other two cams are under 10m and have medium to good strength.
The battery endurance is directly related to the WiFi signal and how many events are registered.
With many false events we could look at frequent battery swaps. That’s OK but when some of the cameras are mounted about 3m high you need to haul the ladder around..
What’s been my experience with the battery endurance?
With on average 30-40 activities per day (that’s mainly me triggering the sensors while working outside), the batteries are still solid green.
At this rate we’re looking at weeks or months before having to swap them out.
Preliminary Conclusions
Having put the AllSecure650 to the test for a few weeks, these are my – preliminary – findings. We intend to update this review with longer term use.
By the way, I have not included any images from my property with this review. Only generic ones. I think you can guess why: I value my privacy too much to show you the placement and view of the cameras…

* THE GOOD THINGS
Swann makes excellent gear. It’s their core business and they’ve been at it for many years.
Outstanding hardware built quality.
Love the extra battery in the hub as well as the inbuilt 1TB hard drive
You don’t need to run to the shops to buy anything for installation: the Kit is very complete.
* THINGS TO WORK ON
Range.
The present range is sufficient to cover most houses but for extended properties it is struggling to get a good signal past 20m from the hub.
The other thing is software.
That’s always the hard part, making it work across different platforms and for people with minimal IT skills.
This will be a continual work in progress.
Finally, the AllSecure650 kit can handle 8 cameras and comes as a Kit with either 3 or 4 of the NVW-600CMB wireless cameras.
If you want to extend the system you can select cameras from their extensive range of cameras but it’s better to stick to the same model because of the easy battery swap.
However, an extra battery is about 250.
UPDATE: I talked to Swann about the relatively high price of getting extra cameras for the system.
If you need an extra set of 4 of the same cameras, that would set you back a thousand bucks!
They came back with the suggestion to buy the AllSecure600 instead for a fraction under $800.
That means those cameras would then cost you just 200 each and you score an extra Power Hub (minus the backup battery)!
Good idea. See the link here.
Recommendation
The AllSecure650 2K Wireless Security Kit is excellent value for money, priced at $949.95 AUD for the 3-camera kit and the 4-camera unit retails at $1,099.95 AUD.
That includes 2-year warranty.
And, yes, having the AllSecure650 alert all day and night, rain or shine, at four corners of my property, makes it better than my guard dog!
The AllSecure650 Kit can be ordered directly from Swann.com (product page with lots of helpful info here).
Or they are available from many leading retailers like Harvey Norman, JB Hi-Fi, The Good Guys and Amazon.

Hi there – did you have an update on the batery life? I read a reviwe that they needed to be changed every 2 odd days? If that’s the case, I don’t think it’s worth the trouble? Would be interested to hear your experience.
Thanks, Anthony
Apologies, Anthony. I received a response from Martin the other day, but got a bit busy with some life stuffs. Below is Martin’s response:
“Happy to report that, so far, battery life is weeks if not months, rather than the couple of days referred to.
But, as you know, there are so many variables that can upset a normal battery life: many false triggers is probably the main culprit. There are ways to mitigate that.
There are still some quirks with the AllSecure650 that I’m working out over time, hence the Preliminary Findings section in the review.
I have made one update (noted in the review) already and plan a few more findings down the track. – Martin”
well done good review but im wondering if you could review sound quality of the sound you can hear and speaker volume and also if possible to connect with out the hub cay could i take away 1 camera caravaning anf connect to my phones hotspot thru the swann app
At the start for some reason battery life was at least a couple weeks which I was very happy with. Afterwards, I found one faulty battery which only lasted half a day without any triggers. After my 2nd charge of the other batteries.. I found that they only lasted a few days which I was surprised. Esp when nothing was changed in the settings. I thought it was because of the charging station. So I decided to charge it via a usb cable which took almost 1 whole day to get fully charged. Once I replaced the whole set of batteries. Overnight, it drained down 2 bars. Eventhough, I have changed the sensitivity to 2 and motion only not PIR & motion. It did not help… I tried live chat to get help and it says that they no longer support any products which does not use Swann Security App. ???? It’s a brand new product and it is compatible with the Swann App. Anyway, I tried to get in touch with support and received an email with the ticket number. It’s been almost 3 weeks and yet I have not heard back from them. Conclusion… Swann products are a waste of money!!!
Unreliable, poor quality, terrible customer service. Very disappointed.
Had high hopes as I had a Swann system about 10 years ago that was OK. This time around bought 4x4K camera NVR. Seems quality and service have both gone downhill since Swann was bought by a Chinese company 2 years ago.
Setup was OK, and PoE NVR definitely simplifies wiring. Turns out the Swann “4K” cameras are really 2.5K cams with digital “upscaling” (have to go hunting through fine print to find this). Picture quality was OK day and night. Software and app setup was convoluted and frustrating. App is OK but difficult to view and shuttle compared to others.
And then it stopped working. After less than 2 months. Wouldn’t recognise cameras, NVR unit kept freezing, crashing, and rebooting. So basically completely useless. As was Swann customer service. Tried to give them a hurry-up as we were a couple of days before a 4day long weekend. Can’t call them, just email, and they didn’t respond for another 5 days. Told me I had to mail the unit back to them ($50 cost to me because their unit failed), and attached a bunch of new terms and conditions I was “deemed to have accepted” by sending them the defective unit – including that they could replace it with a refurbished unit (so I get a 5yr old replacement for my brand new unit), and they would charge me a “handling fee” if THEY decided by unit wasn’t defective.
Deleted my review from their website, so basically any reviews on their website are the good ones they’ve decided to let you see, and misleading false positive review rate.
I gave up and wasted a day pulling out the installation to get a refund where I purchased. Don’t waste your time and money. I’ll be getting something reliable, that is really 4K when they say 4K.